Wednesday, 16 June 2010

Animation

There are 2 different forms of animation in 3D studio Max, these are Key-Framed animation and Parameter/Procedural animation.

-Key-Frame animation is using key frames much like flash software. You can selected auto key then move the key mark along the time line, them change the position of objects at different keys. The computer will then fill in the motions of movement between these keys creating a fluid animation.

-Parameter/Procedural animation is different, here you set parameters on what moves and when, this included foot the foot step animation, here you can set the amount of foot steps you would like and then auto key the inactive steps and the computer will automatically get your character doing basic walking cycles. Parameter animation is also used for fog and rain effects, these would allow you to insert set parameters such as speed and amounts.

To start my animation I created a free camera ( in the screenshot target is selected, ignore that), I chose a free camera because i have more freedom on the movement and focus than that of a target camera. I originally had a camera following a spline but due to turning issues I had to go with key frame animation on a free camera.


I then activated auto key and dragged over to a frame about the third of the way across the time line, i moved the camera above my castle and point it down wards and spun it 90 degrees. I then dragged across the time line again and moved the camera to the other side of the castle and spun it another 90 degrees so it was in up right positions.


I then moved on to making my character walk, this was using parameter/procedural animation. I selected my biped and went to the animation tab, then i selected "footstep mode".
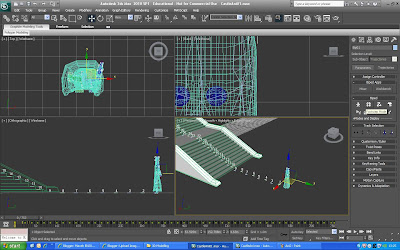
After selecting "footstep mode" a new set of options appeared from these options I selected "create multiple footsteps..."


Pressing "create multiple footsteps..." opened a new window with foot step parameters, here you could change the amount of foot steps, stride length and many other variables. I made 50 foot steps then pressed ok.


After creating these foot steps I clicked "create keys for inactive footsteps" this finished the walking animation and created the key frames for all the step in the walking cycle.


I positioned each foot step on the stairs so my character would walk up the stairs and not through it, I used the select and move tool to put each step in the right position.


I then created a sky box and lighting so the rendered video would look a lot better and wouldn't have black backgrounds. To make the sky box i created half a sphere then deleted the bottom polygons leave the curved semi-sphere, i selected the semi-sphere and flipped it inside out so that my textures would appear on the inside. I then downloaded a panoramic view of a the sky and applied it to the inside of my semi-sphere. I used a target spot light and positioned it over my environment.


I then made the camera follow my character in as he walked up the stairs, then the camera zoomed up next to his head, I used the same key frame method as before. I then moved the camera from left to right to give the appearance of the character looking around.


I then rendered this animation out from the view of the camera into a video format.


I terms of contingency i made regular saves at different stages much like all my previous projects.


Monday, 7 June 2010

Character Rigging

I would usually have to create and align a biped with the mesh, but due to the way I had built my character I had already aligned the biped with my character.

To rig my character to my biped I selected my mesh of my character I then went to the physique modifer.

From the physique rollout I selected "attached to node" this allowed me to select a biped to to attach my mesh to.

To select my biped I pressed "H" to pen the hierarchy window, here i selected "bip01" which was my bidped.


I then hit installize on the new window and that was it.


Rigging my character was a far simpler process then I had originally thought, because of this I didnt need to save the rigging process in stages, instead I did it in one go. After I rigged my character i copied the file across my 3 devices to keep the file safe if one of the other devices broke due to technical fault or weather damage.

Saturday, 22 May 2010

Character

To create my character I first created biped from the biped selection in the systems rollout, this was to give me the basic shape to model around, it also made sure it fits the biped perfectly for when i animate my character later. I then selected a box primitive and placed it around the bipeds torso.


I've moved the bipeds arms up to make it easier to work around and also changed the opacity of the material on my box, this was to make it easy to see the biped through the model. I changed the box into an editable poly so i can change the shape. I used vertex selection to move verticesto appropriate positions.


I then began to cut and extrude segments from the main box to created arms and legs, I then used vertex selection to move vertices to the right positions. I repeated this to create the hands of feet, then the more difficult and fiddly bits like the toes and fingers. I only did this for one side of my model, I deleted the main box polygons on one half of the body and applied the symmetry modifier to insure a symmetrical body(this also saved me a lot of time with those damn fingers).


I now have a basic shape for my character, without a head. I went to the modifiers tab and applied turbosmooth, this took my basic square model and smoothed it making it look more human (a weird looking human but a human none the less).


I left the head until last because i wanted to spend the most time with it, due to extra detail needed and such. i began by extruding several segments from the neck, this is so i have layers for the mouth, eyes etc... i then extruded more segments from the front and back of this head section, then the side's of the head section. this was to fill out the head.


I then moved vertices around to create the shaped of the head, I'm switching between turbosmooth and editable poly selections to see how the finished product is looking.


I deleted the section in the eye sockets and filled the gap with some sphere primitives, I then created a material using a jpeg of an eye and applied it to the spheres. I aligned the eyes with the holes and edited the area around the eyes to remove gaps.


With the basic model done I'll move on to creating the clothes, to do this I made a copy of my basic model, i removed turbosmooth and then turned the model into an editable poly, this allowed me to have a full object instead of having half an object with a symmetry modifier. i then deleted the hands, feet and head polygons to create a basic clothing shape.


I then deleted the polygons along the inside of the legs, then using target weld I connected the vertices to close the gap and create a gown looking object. I then edited the vertices to create the sleeves and widen the base of the gown, i also re-applied the turbosmooth modifier to create cloth like look. I also used the Shell modifier to give a thickness to create a more cloth like effect. I added some white and black textures the the gown to add some color ( not really colors i know)


I then placed the newly created clothing object over my character, I made some edits to the front of the gown to make it look more like a coat. I then applied a skin texture to the rest of model and a black texture to the legs to looks like trousers.


I look at the hair and fur modifier to add more detail to my character but due to render issues I decided to leave my character bald for the time being.


During the character creation process I made many saves at different stages, I had to go back to earlier stages amny times during my character, this allowed me to not have to start again when any little problems arose. I also followed the same principle as when i created my enviroment, every 10 saves I made copies over my 3 devices. This was because the character creation was more difficult and time consuming so more caution had to be taken when file placement.

Monday, 10 May 2010

My Environment - Bringing it all together

I opened a new 3D studio document and went to file>import>merge here i selected my 3 documents and merged them into one file.


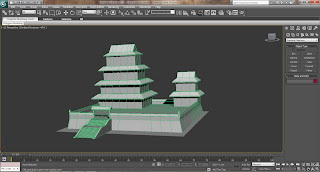
After i merged my files i started to ppeice everything together, i started by cutting a segment from my castle base to house my pond. I also started to add detail to the roof, i bowed the roof sections and brought the top roof section as shown in the image below. I then placed the pond in the area i had created.


I created some walkways around the outside of the house via extrusion modelling and also added the bridge to the pond area, i then edited the textures on the bridge making it look better.


I began to tile the roof on the top, i did this by dividing the roof into many square's, i thn slightly inset these squares and extruded them. I then used the vertex selection to move the top part the tiles back to create a sloped tile.


I repeated this for all the roofing (took forever by the way) i also made some changes to texture colours to allow for eaier viewing of the model . I added some ornaments to the top part of the roof, these were for detail and to cover up some rough edges.


Merging the files was simple and I didnt need to save stages of the merge, so I just made copies over my 3 devices to keep a back of the merge file.

My Enviroment - Bridge

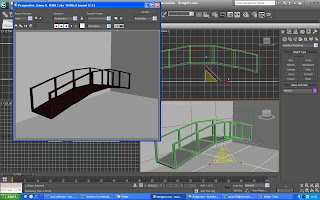
To create my bridge i made a flat recatangle primitive then converted this to an editable poly. i then used extrusion modeling to created the barriers. I then seleceted the vertices of the middle segment and raised them, then repeated for the outer segments to get an arc.

I then used the wood texture in material editor, I chose two different shades of brown and applied the material then rendered it.
I created my bridge in one go so I didnt have to worry about saving it in stages, I just copied the file over my 3 devices and started on the next part of my project.

My Enviroment - Pond

I created a plane from the primitives menu, i then converted this to an editable poly. I used the cut tool to created the outline for my pond, then deleted the out polgons so i had my basic pond shape. I then inset the shape and extrudes the middle polygons down to create a basin.

I decided I wanted a tree to sit the in centre of the pond so I used vertex selection and the soft selection funtion to pull up part of the basin to create a hill.

I created another plane to make my water, then i used the material editor to get a water effect, i used a combination of noise, reflect/refract and opacity to create a realisitic looking water texture. I then used in program tree models and choose a "japanese cherry blossom" to place in my pond.


I then used vertex selection to edit the shape of the water plane to match the shape of the pond. I used a marble texture from the default textures for the pond basin.


I created a few save files for the pond, but overall it was a very short project. I made copies again over my 3 devices keep it safe from technical fault.

My Enviroment - The Basic Model

The first thing I did for my enviroment was created a simple rectantagle primitive and turnded it into an editable poly. I then reducued the size of the to face polygons to create an angled rectangle as the base of my castle.

I then selected set of polygons on top of the rectangle and extruded them, i then inset the polygons and extruded again i repeated this 2 more times to create the bases of my castle. Each segment had 2 extrusions, one for the main body the building and one to create the roof sections.


I then went to create the walls around the perimeter of the castle, i edited the vertices to create thin walls around the outside then extruded them in the same manner as i did fot the main buildings, including 2 segments again. I also created corner posts in the exactly the same way. I left a gap in the wall so i could later create the stairway and entrance.


I then went on to create the roof, to do this I created 1 more segments into the roof section of the buildings using the connect tool on line selection. The allowed to extend the newly created segement out using the uniform scale tool, i now had flat roof. I select the polygons and pulled them down to create sloped roof's, i then rusuced the size the polygons along the y axis to make them thinner.


I repeated this for the the roof sections on the main building and the smaller out house, i then used the connect tool to created a lind down the centre of the top roof segment. I then used the uniform select tool to pull this line up to create a triangular roof at the top.


I then created the stairs, to do this creathe many segemts along the side of the castle base and then extruded them. i then used the vertex selction to move the steps into the right positions, pulling the higher steps back so the ascened upwards.


I then began to add go over some the details of my baseic model, i made the roof smaller, and organised the stiars into cleaner looking sections.


I created side segments to the stairway to just make it look cleaner and generally better, i then champhered the side sgements to make them look slightly cylindrical but still blocky.


Here i created the top of the wall sections in the same way i created the roofs, i added extra segements to the top section of my walls, then used vertex selection and uniform scale to create the upper wall section. I also created an entrance way, to do this i created two pillars either side of the door, then using the polygon selcetion and connect tool connected two polygon faces at the top of these pillars, to create a sort of bridge. then following the same method of my walls created a roof for the entrance way.


I then changed the texture to wait and added some dynamic lighting to get a basic feel for lighting of the final product, i then rendered this.


When creating my basic model I saved on a regular basis in stages, allowing me to back track if any problems arose. Every time I reached ten file saves I made multiple copies over my laptop, student drive and portable hard drive. I had about 30 file saves of this model so I had plenty of different stages I could go back to, which i had to do several times during the creation of the basic model.